


En esta ocasión nos muestran como daremos las ordenes a nuestras unidades y como reaccionaran estas.
BattleLore Second Edition is a two-player board game of unit-based fantasy combat and tense battlefield tactics set in the realm of Terrinoth. In every game, you and your opponent become the commanders of two rival armies. One player leads the disciplined and well-trained army of the Daqan Lords. The other player controls the ferocious, demon-worshipping Uthuk Y’llan. Only one of you can rise victorious over the field of battle.
In our first preview, we examined the choices you make when choosing a scenario card, determining both special rules and victory point opportunities, as well as where your units can be deployed. Next, we illustrated how to muster an effective army that matches your goals and your preferred play style for the coming game.
As you fight to outmaneuver your opponent, you must lead your army into combat using the command cards in your hand. BattleLore Second Edition rewards cleverly positioning your troops around the battlefield, whether you’re preparing to defend against enemy assaults or making an attack of your own. In this preview, we’ll explore command cards and unit movement in BattleLore Second Edition, as well as the different kinds of terrain your units may encounter on the battlefield.

Orders from the General
In order to move and attack the enemy, your units must first receive your orders, which you issue by playing a command card from your hand. After you and your opponent have finished mustering your armies at the beginning of the game, you each draw six command cards and three lore cards. Although two command cards and one lore card must be discarded, by choosing which cards suit your opening plans best, you can pursue your overall strategy as soon as the game begins.

Command cards are split into two basic types. The first shows the battlefield and allows you to order units in one or more sections. The game board in BattleLore Second Edition is divided into three sections – left, center, and right. For example, by playing Echelon Left, you would be able to order two units in the left section and one unit in the center.Attack Right, on the other hand, allows you to order three units in the right section of the battlefield.


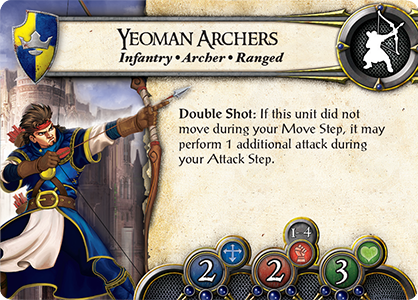
The other type of command card has different effects, and tends to order units based on their type, rather than their position on the battlefield. For example, Cavalry Charge offers you the opportunity to order three cavalry units anywhere on the battlefield. In addition, your cavalry units roll an extra die when engaging in combat this turn. A command card like Darken the Skies, on the other hand, allows you to order three of your archer units on the battlefield, each of whom has the opportunity to make an additional attack if they don’t move. Whichever command card you play, your orders determine which units can move this turn.
On the March
In our past previews, we looked at an example game between Sam, who controls the Daqan Lords, and Taylor, who commands the Uthuk Y’llan. They have already chosen their scenario cards and mustered their armies. It is now the beginning of Sam’s turn, and he must choose which command card he wants to play this round. Sam looks at the battlefield and decides that he wants to press forward on the left flank. After looking at his command card options, Sam decides to play Echelon Left, which order two units in the left section and one unit in the center.
Sam must choose which units he wants to order on the battlefield, and decides that two of his Riverwatch Riders in the left section will give him the greatest opportunity to make a quick advance, and that he support that advance by moving a unit of Yeoman Archers in the center. After you play a command card and order units on your turn, you must determine how you want your units to move. On every unit reference card, the leftmost number is that unit’s movement value, indicating how many hexes it can move when ordered. The Yeoman Archers, for example, have a movement value of two, indicating that they can move up to two hexes when ordered.

Sam wants to grab the two victory point banners in the left section of the battlefield and hold them for as long as possible, hoping to gain a crippling advantage before being pushed back. Sam moves his first Riverwatch Riders unit forward two hexes into the leftmost building hex, which has a victory point banner on it. If Sam still has a unit on this banner at the end of his turn, he will receive a victory point for it. The Riverwatch Riders unit has a movement value of three, so it cannot continue moving past the building hex this turn. Even if it had movement left, buildings are a type of terrain that stops movement, which forces the Riverwatch Riders to remain there. Keeping his cavalry in the building hex gives Sam a defensive bonus as well. Whenever a unit in a building is attacked, the first point of damage dealt against that unit is ignored. Sam moves his second Riverwatch Riders unit forward as well, moving it three hexes to rest beside the Riverwatch Riders unit in the building.
Sam has completed moving units in the left section, but his command card also allows him to move one unit in the center section of the battlefield. Sam elects to move a Yeoman Archers unit, which has a movement value of two. Sam moves the archers two hexes, moving them from the center section into the left section and situating them in the other building hex on the left flank of the battlefield. We’ll cover combat more extensively in our next preview, but Sam hopes that his Yeoman Archers’ ranged attacks will be able to cover his Riverwatch Riders. Now that Sam has ordered and moved his units, his movement phase is over.

Mind Your Surroundings
As you command your army’s movement in BattleLore, you must carefully factor the terrain on the battlefield into your plans. Terrinoth features a much wider variety of terrain than just buildings, and your units may be forced to battle in thick forests, lofty hills, or narrow fords.
Some terrain provides a bonus to certain units. Hill terrain, for example, allows any ranged units to fire over the heads of other units on the battlefield, which can provide a critical advantage. Forest terrain limits units’ combat dice to two, whether a unit is attacking out of a forest, or into a forest. The final terrain in BattleLore is water. The rivers and lakes that cross your battlefield are impassable, except at fords or bridges. Although units can move freely and quickly over bridges, moving into a ford stops a unit’s movement. Fords can become deadly, because although they provide a vital river crossing, unit movement through a ford can slow to a crawl. Seizing a ford can put your opponent in a dangerous position unless he can force his way through.
Brace for Impact
Your army has been arrayed, and the units are in motion. If your guidance is going to lead your army through the battle to come, you must decide carefully where to position your units and when to move into direct combat with the enemy. In our next preview, we’ll explore the bloody conflict of BattleLore Second Edition. Look for BattleLore at local retailers in the fourth quarter of 2013!
Your army has been arrayed, and the units are in motion. If your guidance is going to lead your army through the battle to come, you must decide carefully where to position your units and when to move into direct combat with the enemy. In our next preview, we’ll explore the bloody conflict of BattleLore Second Edition. Look for BattleLore at local retailers in the fourth quarter of 2013!


0 comentarios :
Dí lo que piensas...