


Aun teniendo Batallas de Poniente en mi Ludoteca, este Battlelore cada vez se va ganando más mi interés.
La ambientación las ilustraciones, las minis me parecen excelentes, ademas me gusta el entorno Terrinoth.
Lo iremos siguiendo.
BattleLore Second Edition is a two-player board game of battlefield tactics, where the armies of the Daqan Lords clash with the Uthuk Y’llan on the borderlands of Terrinoth. By strategically commanding your troops and seizing victory-point banners, you will establish yourself as an able commander and claim victory over your foes. But before you can defeat your opponent on the field of battle, you must muster an army that suits your strategy for the coming game.

In our last preview, we examined the importance of choosing a scenario card, which determines both opportunities for victory points and the terrain on your side of the battlefield. Your choices in BattleLore Second Edition don’t stop after you’ve chosen a scenario card, though. Next, you must decide what units will make up the army that will pave your road to victory.
Choose Your Warriors Wisely
 BattleLore Second Edition offers a host of options for customizing your armies, but it also includes three army cards for both factions. Each army card features a pre-constructed army arranged around a theme such as Reign of Venom or Blackened Skies. By using one of these army cards, all you need to do is deploy your army, allowing the battle to begin even faster. Once you’ve picked up the basics of mustering an army, however, BattleLore Second Edition offers you the opportunity to tailor an army that fits your chosen strategy in each game.
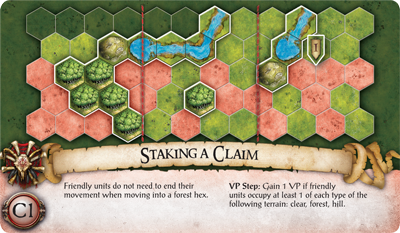
As an example of mustering armies in BattleLore, Sam and Taylor have just finished placing the terrain on the battlefield that matches their chosen scenario cards. Sam chose the Damming the Muir River scenario card, and Taylor chose the Staking A Claim scenario card. Now that the terrain has been placed and both players have placed a ford on a river hex, it’s time for the players to decide exactly what units they wants to use in their armies.
Both players begin the game with fifty mustering points, to be spent on their factions’ deployment cards, which are placed face-down on the setup hexes. Once both players have completely mustered and positioned their armies, the deployment cards are revealed and the units are placed on the board. An army cannot exceed your unit count, but if you want to expand your options for army-building even further, an additional core set can be added, inviting you to build armies with more mustering points – potentially allowing you to wield the might of a cavalry army, or even multiple Roc Warriors or Chaos Lords.
In our example, Sam wants to muster an army that suits the strategy he is planning for the coming game. Specifically, he hopes to hold a strong defensive position in the middle, while making a quick advance to grab victory points on both flanks. Depending on how the game plays out, he may even be able to catch Taylor’s forces in a pincer movement.

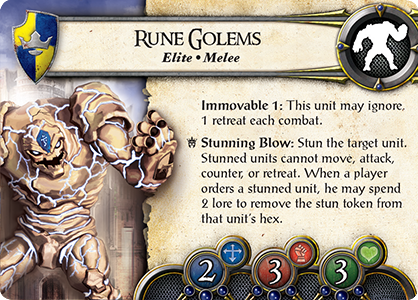
Sam’s scenario card, Damming the Muir River, offers him several advantages. The special text on Sam’s scenario card allows his units to move through fords without ending their movement. It also gives him an opportunity to score victory points by situating his Rune Golems on fords.
Sam obviously needs Rune Golems if he is going to take full advantage of his scenario card, so he takes the two deployment cards which correspond to the Rune Golems. In the bottom left-hand corner of every deployment card is a number, indicating how many mustering points it will take to use that unit in an army. Sam’s two Rune Golems have a total of twelve mustering points, leaving him with thirty-eight more to spend.
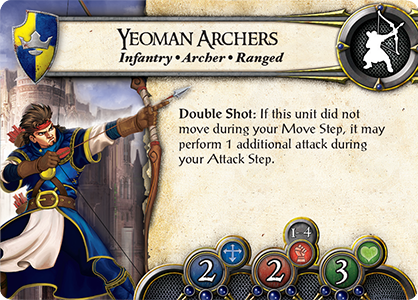 After examining the layout of the battlefield some more, Sam confirms that there isn’t much to gain from pushing forward in the center. His units can gain cover during an attack so long as he uses the forest terrain wisely, and he has no victory point opportunities in the center section of the battlefield. Sam decides that he wants strong defensive units in the center of the battlefield. After examining his options, Sam decides on three Citadel Guard units, with two Yeoman Archer units to repel enemy assaults in the center and support his attacks on the flanks. These five units total twenty mustering points, so with the twelve points from his Rune Golems, Sam has eighteen points left to spend.
Sam also hopes to make a quick attack on the left flank and seize control of the two victory-point banners in the left section of the battlefield. With that thought in mind, Sam starts by thinking of his Roc Warrior with some supporting infantry units, but he decides that the Roc Warrior’s great speed may cause it to become overextended. If the Roc Warrior is cut off from the rest of his forces, it may be overwhelmed on its own. Sam chooses to muster three units ofRiverwatch Riders instead. The Riverwatch Riders have several formidable special abilities, but perhaps more importantly, they each have a movement rating of four, allowing them to stay together and move as a group, making it much harder for the Uthuk Y’llan to overwhelm them.
 In addition, the cavalry’s quick movement will enable Sam to make a grab for the two victory point banners on the left flank, hopefully claiming them before the Uthuk Y’llan have a chance to close in. If he needs to support his cavalry later, Sam decides that he can split some units off from his infantry in the center.
The addition of the Riverwatch Riders units brings Sam to fifty mustering points. Sam also has the option of choosing to muster a command tent. A command tent has a muster value of -5, meaning that if he takes a command tent, he now has five more mustering points to spend on units. However, no units may be placed farther forward than the command tent, and if the enemy takes control of it, the command tent is removed, and his opponent immediately scores two victory points. Although he could muster another unit if he used a command tent, Sam’s ideal setup would require him to place his command tent close to enemy lines. Sam doesn’t think he could protect his command tent adequately in this situation, so he decides against using one.
Array the Lines of Battle
Sam’s final army consists of two Rune Golems units, three Citadel Guards, two Yeoman Archers, and three Riverwatch Riders units – ten units that total fifty mustering points. If Sam had not spent all of his mustering points, he would have received any unspent mustering points as lore. Now that Sam has mustered his army, he must determine exactly where he wants to deploy his units.
On each player’s scenario card, eighteen hexes are filled in with the faction’s color. Sam has taken the ten deployment cards that correspond to the ten units he has chosen, and he now takes eight Decoy deployment cards, to give himself eighteen deployment cards. One deployment card must be placed face-down on each deployment hex to dictate the secret position of each unit on the battlefield. Any hexes where Sam does not want to place a unit are filled with a Decoy deployment card, to disguise the true position of his forces.

Sam’s deployment hexes are arranged in a large wedge in the center section and in lines on both flanks. Sam begins by placing the deployment cards for the Citadel Guard at the very top of the wedge in the center section. He wants them to be the first line of defense against the Uthuk Y’llan attack. Sam deploys the Yeoman Archers closer to the edges of the center section, so that they will be in position to support any part of the battle. Finally, Sam places some Decoys, and places his Rune Golems and Riverwatch Riders as far forward as they can be on the right and left flanks, respectively.
Once every deployment hex is filled with a deployment card for a unit or a decoy, Sam has completed mustering and deploying his army. Taylor has also finished mustering and deploying her forces, and both players reveal their deployment cards and place their units on the battlefield. The armies are fully mustered and on the march to battle!
Lead Your Men Forwards
A worthy commander must be able to see the advantage in hills and forests, and be able to maneuver his forces to block an enemy advance. Check back for our next preview, where we’ll discuss command cards, unit movement, and terrain effects in BattleLore Second Edition. Prepare your troops for battle!


0 comentarios :
Dí lo que piensas...