


En todo caso, los chicos de FFG, nos ofrecen un nuevo avance para aquellos, que si estéis interesados.
It was Carnival in Rio, but you couldn’t tell. The city was a ghost of itself, mostly silent, except for the faint blare of distant car alarms and the crackle of nearby fires. Smoke choked the night skies. Somewhere in the ruins, the aliens were hiding, setting their trap. That fact made the team nervous, but it was their job to spring the trap. The science division needed a body…
XCOM: The Board Game is divided into two phases: the timed phase and the resolution phase. These phases are not intended to replicate the strategic and tactical dimensions of the acclaimed computer game series, but they do lend a familiar call-and-response structure to your game rounds.
Much has already been made of the timed phase. We’ve offered closer looks at the game’s digital companion app and how it generates tension by forcing you to respond to the alien invaders’ three-pronged attack in real-time. Additionally, players and reviewers who participated in demos at Gen Con Indy and PAX have contributed their own insights into the nature of the app and the tough decisions that you’re forced to make quickly with limited information. They have also addressed how these elements work together to forge an XCOM experience that is every bit as intense and compelling as it is unique.
Less has been said about the resolution phase. This isn’t because it’s any less interesting or vital to your game. It’s simply because, even though the app still guides you through your actions, the resolution phase isn’t as immediately tied to the app. The timer is turned off. You’re not receiving any new alerts. All the intel you need to make your decisions is openly available on the table. The pressure, however, doesn’t ease off for a second.

Humanity’s Survival Is at Stake
After you’ve closed the last of the app’s alerts from the timed phase, the timer shuts off, and the app prompts you to move through the various steps of the resolution phase. Here, you try to research the new technologies to which you’ve committed your science staff, you combat UFOs, you use your satellites to deal with UFOs hovering in orbit, you defend your base, and you conduct the missions to which you’ve assigned your soldiers.
Of course, each task is loaded with significance, instilled by the fact that humanity depends upon your successes, and your failures have very real consequences:
Research
As your Chief Scientist researches new technologies, they grant special abilities that greatly empower the different XCOM heads. For example, when you engineer a Blaster Launcher, the Squad Leader can exhaust it to place a success on any enemy that has a heavy soldier assigned to it. Likewise, by unlocking the secrets of Elerium, you allow the Commander to add two credits to your Emergency Funding each round.


These technologies and others create powerful advantages that add up as the game goes on, and they’re necessary. You start the game outmatched, looking to combat a foe who has already established a presence across the globe and sown panic among the world’s nations. Each round that you don’t successfully research new technology is another round that you’re almost certain to fall further behind.
Orbital Defense
The Central Officer, meanwhile, needs to use XCOM’s satellite defense network to destroy UFOs in orbit. He needs to eliminate these UFOs in order to maintain clear lines of communication, as we saw in an earlier preview. He also needs to eliminate these UFOs because if he can’t eliminate all of them, the nations begin to panic, and you must advance your least panicked nation or nations one space along the panic track for every UFO remaining in orbit.

After the Central Officer resolves the team’s orbital defense, three UFOs remain in orbit. The team advances the two least panicked continents, Africa and North America, along the panic track. Then, there are three continents all at the lowest stage of panic: Africa, Asia, and North America. Forced to advance a continent one more space along the panic track, the team decides to advance Asia.
Global Defense
While the Central Officer is combating UFOs in orbit, the Commander oversees your team’s global defense efforts, directing XCOM’s Interceptors in their battles with UFOs. UFOs that your team don’t eliminate each elevate the levels of chaos and fear throughout the continents over which they hover, and you have to advance each continent a number of spaces along the panic track, equal to the number of UFOs flying over it.

After the Commander resolves the team’s global defense, two UFOs continue their invasion of Australia, forcing the continent forward two steps along the panic track.
Base Defense and Missions
More than anyone else, the Squad Leader has his hands full during the resolution phase. As Squad Leader, you are responsible for both the defense of your base and the completion of the game’s various missions, including your scenario’s final mission. This means you’ll have plenty of tasks to resolve each round.
Each enemy counts as a task, and each mission features three different tasks, at least one of which will be an enemy. You need to defeat these enemies and complete these missions to prevent damage to your base and advance your team toward its final mission. As with the other tasks, yours come with consequences for your failure. Should you fail to destroy the enemies that assault your base, your base suffers one damage for each remaining enemy. Should you fail to complete your mission, you almost certainly stall your advancement to the final mission by one game round.

Your final mission, like all missions, features three tasks, including at least one enemy. To complete a mission, you must successfully resolve all of its tasks.
Thus, with all these objectives and consequences at stake, your resolution phase begins with a sense of urgency. You don’t just want to research those Battle Scanners; you feel a real need to get them to your troops. You know if you don’t eliminate the UFOs hovering over Asia, the whole continent will come within a hair’s breadth of utter panic. After suffering damage to your base in an earlier round, you’ll feel your back against the wall, knowing that you need time to win the war, and you can’t afford to allow any enemies to disrupt your plans.
Are You Willing to Pay the Price?
All the different tasks that you’ll undertake in the resolution phase use the same, mechanically simple push-your-luck dice system, yet to say that these tasks all feel the same is misleading. Even more, to say that the decisions you make while you undertake these tasks are as simple as the mechanics they employ is to grossly misinterpret their nature.

XCOM: The Board Game comes with four blue XCOM dice and one red enemy die.
To complete any task in XCOM: The Board Game, you roll a pool of six-sided dice, aiming to score a number of success results indicated by the task. Some of the game elements that introduce tasks, such as enemies, leave play at the end of the round, but if the task you’re undertaking is of the majority that don’t leave play, you can save your successes from round to round.
You build your pool of dice by committing resources to them. During the timed phase, when you are prompted to allocate your scientists to different research projects, you’re setting yourself up for the resolution phase. Likewise, as your team deploys your Interceptors and assigns your soldiers to base defense and the current mission, your preparing for combat. For each scientist assigned to a specific research task, for each Interceptor in battle over a specific continent, or for each soldier assigned to battle an enemy, you add one blue XCOM die to the pool of dice you use to attempt that task in the resolution phase.

Because there are two Interceptors assigned to global defense in North America, the Commander adds two blue XCOM dice to his dice pool, as well as one red enemy die, which is added to every task’s dice pool.
One other die is automatically added to the dice pool for each task: a single red enemy die. Each task has a threat level that starts at “1,” and each time you attempt that task, the threat increases by one. This is important because if you don’t immediately succeed on a task, you can choose to push harder, committing your soldiers, scientists, or Interceptors more fully to the job. When you push, then, you reroll all the dice in your pool, both the XCOM dice and the enemy die. However, even as the game’s dice system encourages you to make multiple attempts at your tasks, there are prices to be paid whenever your result on the enemy die fails to exceed the task’s threat.

After each roll at a task, its threat increases.
If you fail to score a result on the enemy die that exceeds the current threat while you’re performing research, all the scientists assigned to the task are turned facedown, exhausted, and cannot attempt research on the next turn. Even worse, if you fail to exceed a task’s threat level during your global defense, base defense, or mission, the Interceptors and soldiers that you have assigned to those combats are lost, and you lose the ability to use those soldiers later in the game. This means you have to build more Interceptors or recruit more soldiers, but adding to your forces once again requires that you spend more credits – credits which are in short supply.
Thus, at some point, you have to decide if you can cut your losses at a task. Partial successes might have to suffice. For instance, if you assign three Interceptors to defend Europe from three UFOs and destroy two of those UFOs before the task’s threat level rises to “3,” you may decide to let Europe move one step along the panic track rather than risk all three of your Interceptors just to take down one last UFO.
Yet, partial successes are also partial failures, and small advances along the panic track quickly add up.
The Squad Leader
|
More than any of XCOM’s department heads, the Squad Leader needs to be comfortable making hard decisions in the heat of battle. When you play as Squad Leader, you are constantly sending your soldiers into lethal combats, and you have to coordinate more of these events each round than your fellow department heads.
Whereas your colleagues are each responsible for a single aspect of the war effort each round, you need to conduct both the defense of your base and push toward the completion of missions. Additionally, both these responsibilities often require multiple tasks. Every mission requires three tasks, and your base may come under siege by as many as three enemies.
Worse yet, some of those enemies, like a Thin Man, can spawn new enemies in their locations when they’re destroyed, meaning that you may have to defeat four or more enemies, in order to successfully defend your base defense.
Finally, whereas as the Chief Scientist sees the threat level reset to “1” between each research project, and the Commander sees the threat level reset to “1” between engagements over different continents, your threat level does not reset between the different tasks in your base defense or between the different tasks of your mission. In other words, to complete any given mission in a single turn, you need to attempt at least one task while the threat level hovers at a fairly menacing “3,” and the odds are good that you’ll see your threat level rise even higher than that.
Accordingly, you’re constantly forced to make hard decisions. Will you risk the lives of the men and women you’ve assigned to your base defense or a mission, or will you pull them back to regroup and allow the aliens to retain another foothold for their invasion?
Engaging the Enemy
As Squad Leader, you don’t just face more tasks each resolution phase than your colleagues, your tasks are more complex.
Enemies require that you score a certain number of successes to defeat them, but they also limit the number of soldiers that you can assign to a combat. Each enemy features a number of skills, some of which may be bordered in gold to show that they are specialized. You can only assign one soldier per enemy skill icon, and each soldier needs to own a skill icon that matches the icon to which he or she is assigned.

Fortunately, your soldiers are among the world’s best trained, and there are ways that you can increase the number of dice you roll for your tasks.
- If a soldier who is specialized in a skill, as indicated by the gold border on that soldier’s skill, is then assigned to an enemy’s specialized skill, that soldier adds an extra die to your pool.
- If the Commander inducts one of your soldiers into Officer Training during the timed phase, that soldier becomes elite by the end of the round and adds an extra die to any task to which he or she is later assigned.
- The Chief Scientist may be able to provide your troops with other advantages by researching technologies such as Run & Gun and Battle Scanners. In fact, the Chief Scientist can help you guarantee a number of successes with technology like the Blaster Launcher.
The fact that your soldiers interact with tasks in specific ways means that you might have decisions to make during task resolution beyond simply commanding your soldiers to push further forward or fall back.
For example, you may assign a squad of four soldiers to your base defense: one heavy, one sniper, and two support, one of whom is elite.

The Squad Leader assigns one heavy, one sniper, and two support soldiers to base defense. One of the support soldiers is elite. (Click on the above image to view a larger version.)
This squad may have to gun through two Sectoids before confronting a Cyberdisc. Let’s imagine, for the sake of this example, that your squad manages to come face to face with the Cyberdisc as the threat level hits “3.” You go all-in on your first attack, placing an assault soldier on your Run & Gun and a sniper on your Battle Scanners. You assign your best squad to confront the Cyberdisc, sending the heavy, the sniper, and your elite support soldier. You’d use your Blaster Launcher, too, but you already exhausted it to destroy a Thin Man.
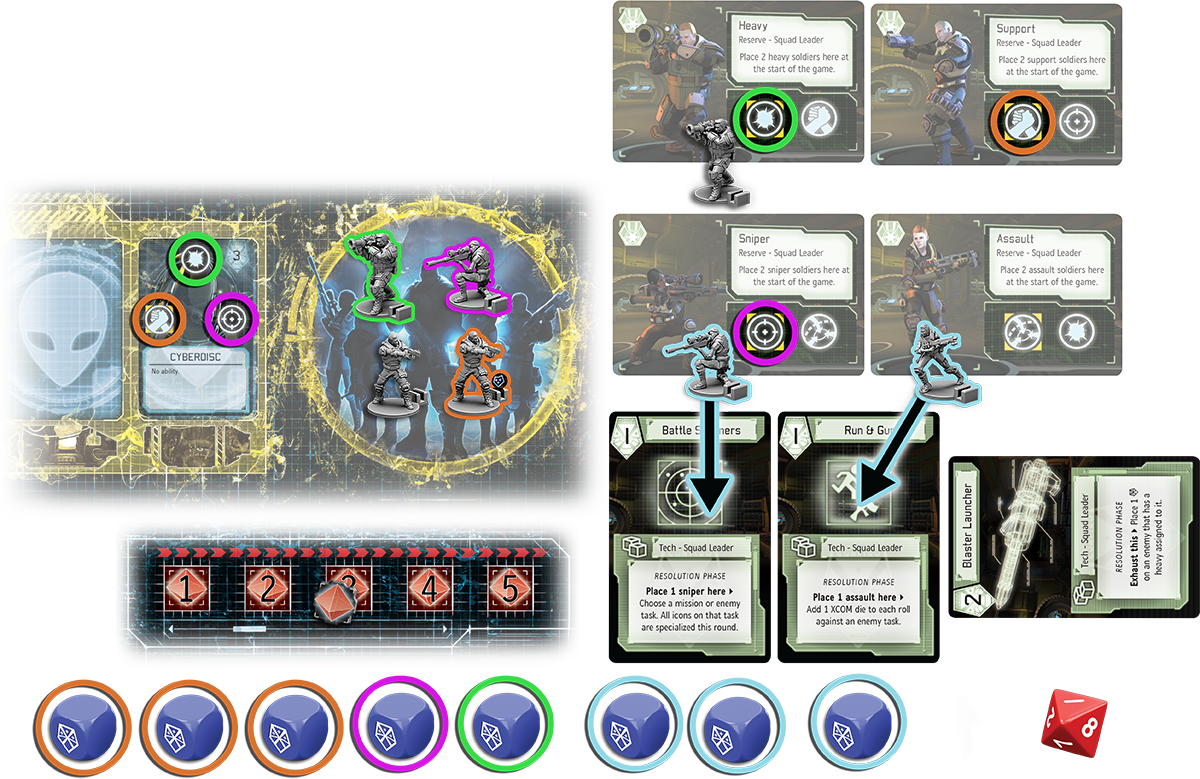
As the Squad Leader builds the task’s dice pool, he adds three XCOM dice (orange) when he assigns his elite support soldier to an enemy skill that matches his specialized skill, he adds one XCOM die (purple) when he assigns his sniper to a second enemy task, and he adds one XCOM die (green) when he assigns his heavy soldier to the third and final enemy task. Wanting to complete the task in one, final push, he places an assault soldier on Battle Scanners to treat all the enemy’s skills as though they were specialized; this means that his heavy and sniper now match specialized skills with their specialized skills, and the Squad Leader adds two more XCOM dice to his pool. Finally, he places a sniper on Run & Gun to add an eighth XCOM die. (Click on the above image to view a larger version.)
Despite your massive assault, the Cyberdisc’s defenses prove too tough to crack. You roll eight XCOM dice but score only two successes. The Cyberdisc survives, and the threat level rises to “4.” Now, your next attempt to destroy the enemy is as likely as not going to require the sacrifice of your soldiers.

The Squad Leader’s pool of eight XCOM dice yield only two successes, failing to destroy the Cyberdisc. Still, the enemy die is an “8,” which is higher than the previous threat of “3.” The threat advances to “4,” the Cyberdisc remains, the soldiers are still available, and the Squad Leader faces a tough choice in the heat of battle. (Click on the above image to view a larger version.)
What do you do?
- One option is to commit your best forces one more time and hope for the best. Still, while you’re likely to destroy the enemy, there’s a real chance you’ll lose your best troops. If you lose your elite support soldier, you’ll lose his extra die, and if you lose your heavy, you’ll lose the ability to utilize your Blaster Launcher in future rounds.
- Another option is to pull back and seal off the section of your base with the Cyberdisc in it. You suffer one point of damage to your base, but your soldiers live.
- A third option is to assign a different group of soldiers to finish off the Cyberdisc. If your heavy and your elite support soldiers are the ones who are most valuable for future defenses, you can pull them back and assault the Cyberdisc with your sniper and non-elite support soldier. Perhaps they’ll finish it off. Perhaps they’ll die. Perhaps both sides will perish in a massive explosion.
As Squad Leader, you need to be able to make these types of tough calls. The men and women who form XCOM’s elite infantry put their lives in your hands, but you can’t shy away from sending them into danger. All of humanity is at stake. If you can push hard enough at the right times, and if your teammates can give you the tech and funding and time that you need, then maybe – just maybe – you can get the intel you need to launch one final, decisive mission and save humanity.
Prepare to Face the Invasion
The Squad Leader may be the department head responsible for conducting XCOM’s final strike, but he’ll never get the chance if you can’t get your whole team to work together. In our next preview, we’ll take a look at the Commander and explore how, as Commander, you must take the lead in your team’s efforts against the alien invaders.


Una preguntita, cuando en el comienzo del post dices que no te convence mucho, ¿a qué te refieres exactamente, al propio juego de ordenador o a la adaptación a juego de mesa?
ResponderEliminarNo el juego de ordenador me encanta, todavía guardo mis viejas versiones, incluyendo el Xcom Terror from de Deep, Lo que no termina de convencerme es la adaptación en mesa. No hubiese estado mejor un juego táctico, al estilo Descent o Imperial Assault? De todas formas, hasta no catarlo, tampoco se puede ser muy categorico.
ResponderEliminar